
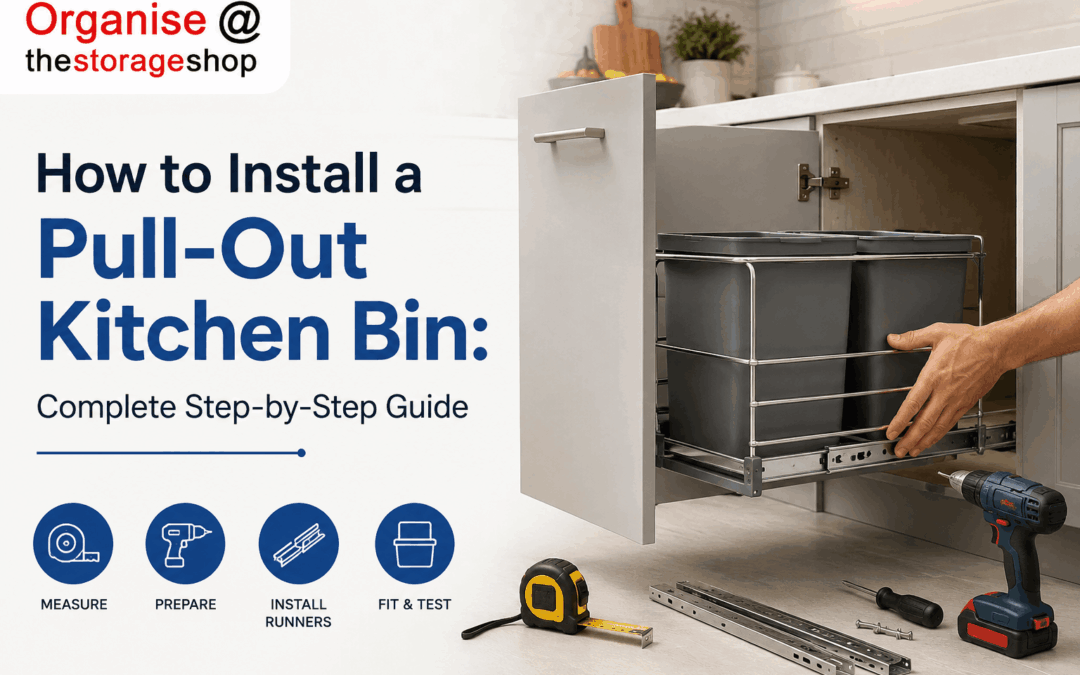
A pull-out kitchen bin makes everyday waste disposal cleaner, easier and far more organised. Instead of a freestanding bin taking up floor space, your waste containers stay hidden inside a cabinet and simply slide forward when you need them.
Getting it right, though, takes a little more than dropping the bin into an empty cupboard. You’ll want to check the cabinet measurements, work out the mounting system, and make sure the runners won’t clash with hinges, plumbing or the door. This guide walks you through measuring, positioning and installing a pull-out bin correctly — written so a confident DIY homeowner can follow along, with enough detail for an installer or cabinetmaker to use as a quick refresher.
Before you choose a system, browse our range of pull out kitchen bins and compare the cabinet requirements, capacities and mounting styles listed for each product.
How Do You Install a Pull-Out Kitchen Bin?
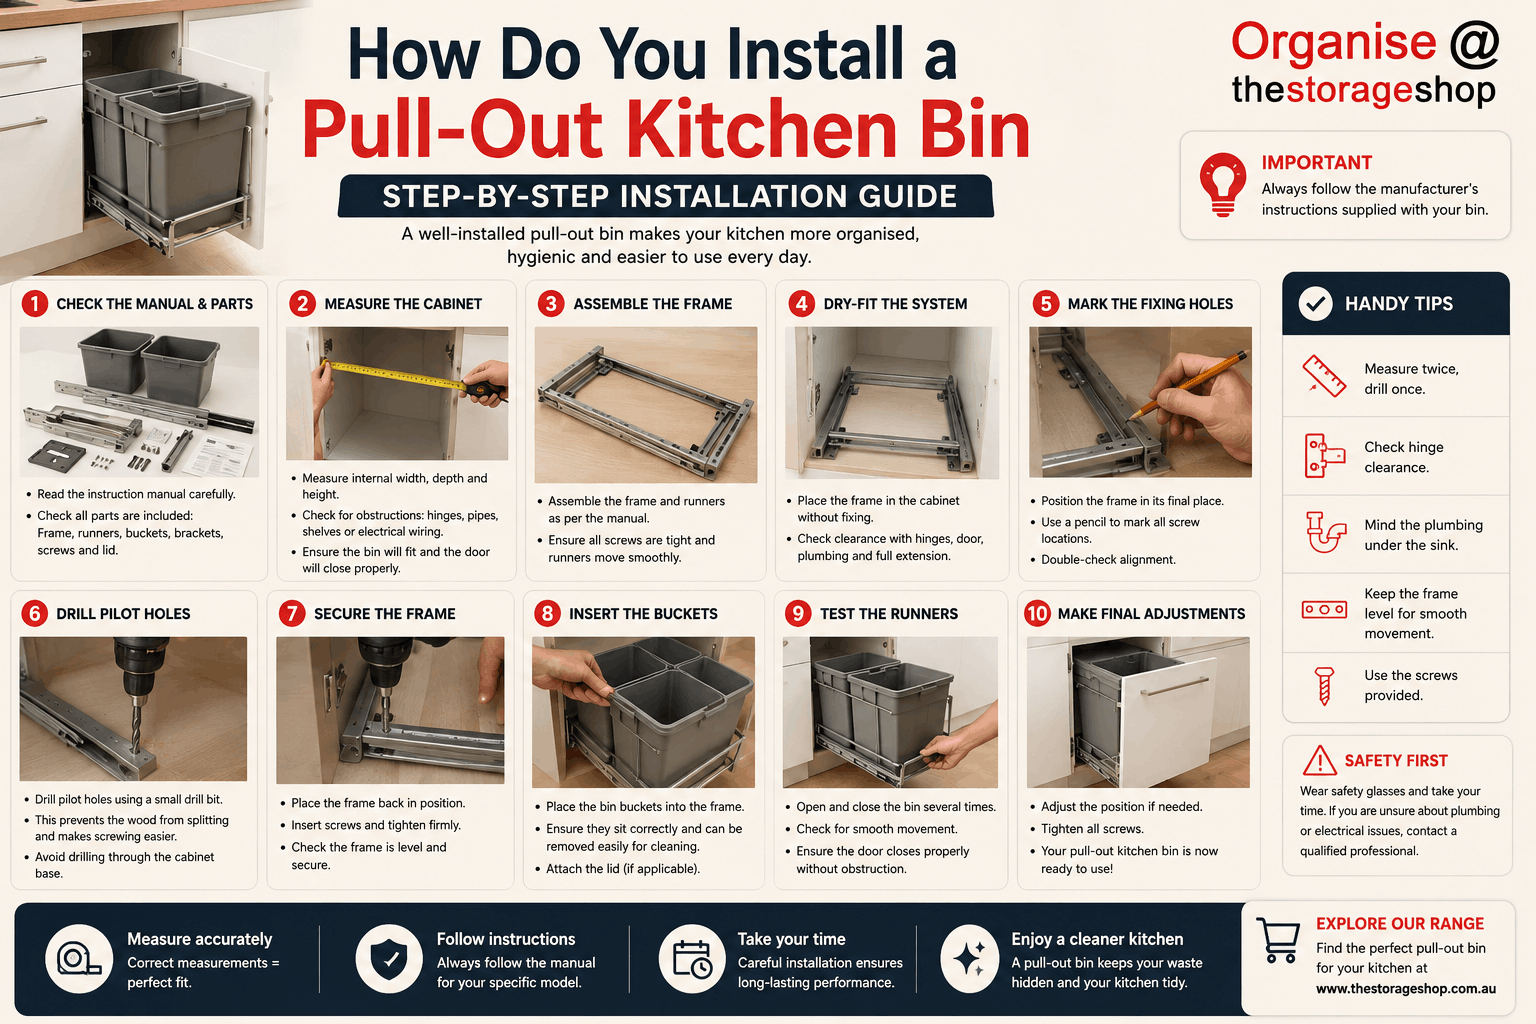
To install a pull-out kitchen bin, measure the usable internal cabinet space and confirm your chosen system fits. Assemble and dry-fit the runner frame, mark the fixing holes, and drill shallow pilot holes. Secure the frame, insert the bin buckets, and test the runners several times before final tightening. Door-mounted models also need the cabinet front aligned carefully before the brackets are fully tightened. Installation time varies according to the mounting system, cabinet condition and whether door or plumbing adjustments are required.
The exact process varies between products, so always follow the instructions supplied with your bin.
Can You Install a Pull-Out Kitchen Bin Yourself?
Yes — most base-mounted pull-out bins can be fitted by a confident DIYer using basic measuring and drilling tools, especially when the cabinet is empty, level and clear of plumbing or wiring.
It’s worth calling in a professional when plumbing needs to be moved, electrical cables run through the cabinet, the base is damaged or uneven, the cabinet front needs cutting, or the system uses complex side-mounted hardware. And never force a bin into a cabinet that’s too small — a tight fit will affect the runner movement, door alignment and long-term reliability.
Not sure whether a pull-out bin is right for your kitchen? Our comparison of a pull out bin vs standard kitchen bin weighs up accessibility, floor space, cleaning and capacity. If you’ve already decided, read on.
What Type of Pull-Out Bin Are You Installing?
The mounting method changes how the bin is positioned and secured, so identify yours first.
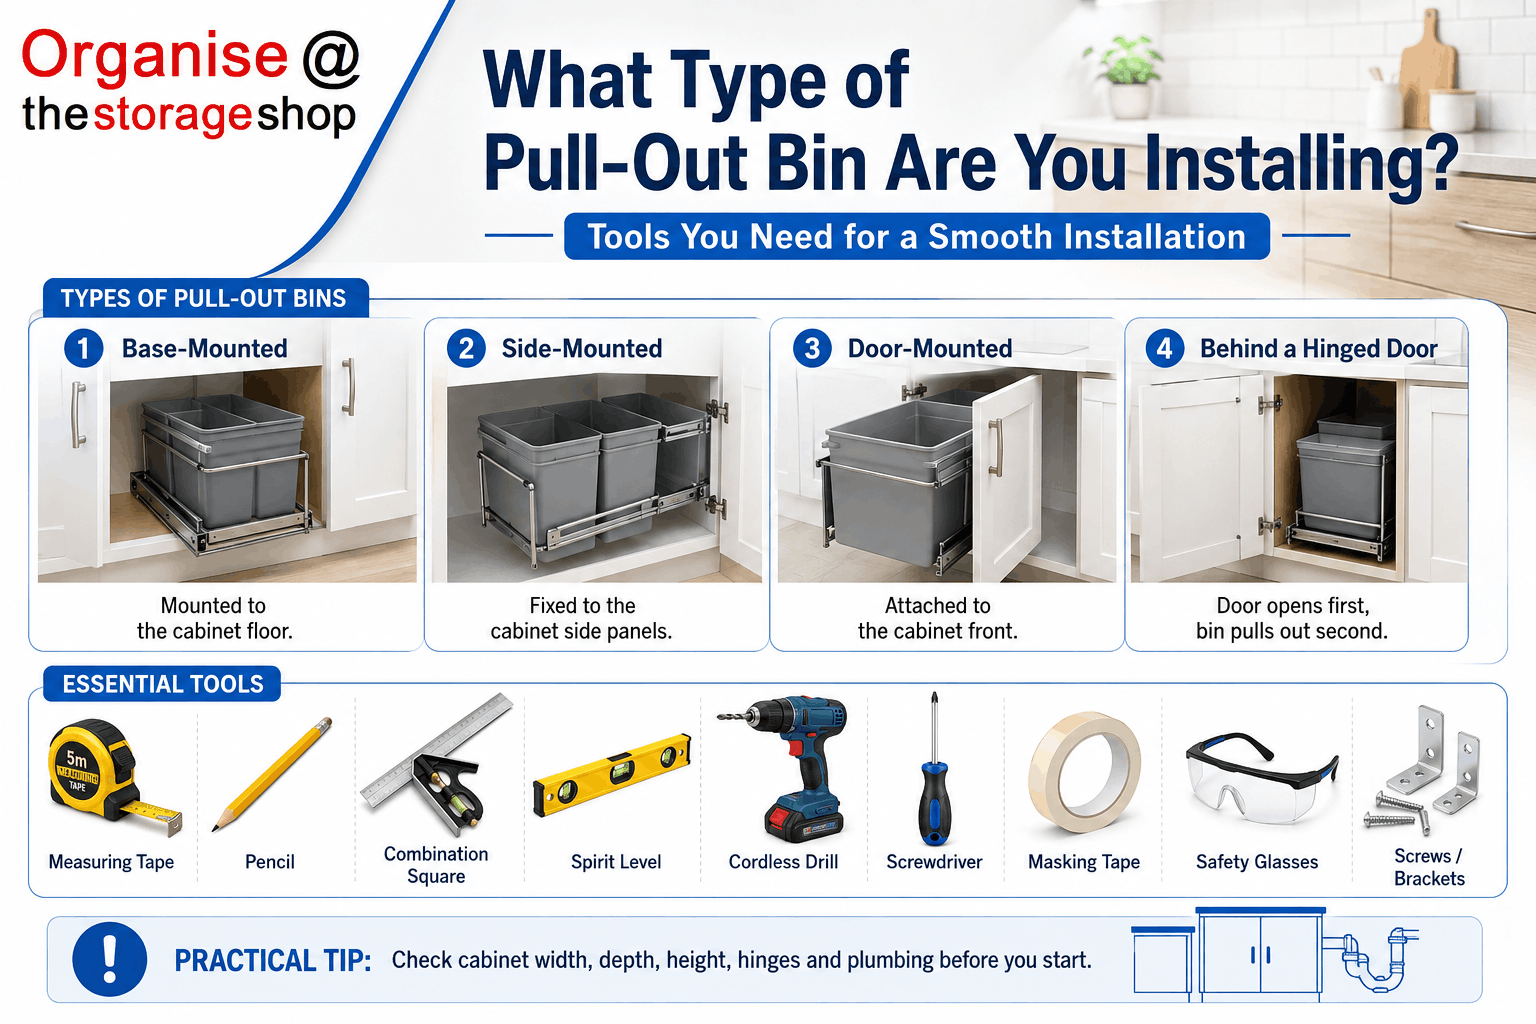
| Mounting style | Where it’s fixed | Main installation consideration |
| Base mounted | Cabinet floor | The base must be flat, strong and level |
| Side mounted | Cabinet side panels | Both runners must sit at equal heights |
| Door mounted | Runner frame and cabinet front | The door needs accurate gap and height adjustment |
| Behind a hinged door | Cabinet floor or sides | The bin must clear the hinges and open door |
- Base-mounted bins attach to the cabinet floor and are the most common choice, since the frame can be positioned, marked and fixed from above. The base needs to be solid enough to hold the frame and waste load — loose shelves or thin removable panels may not provide adequate support.
- Side-mounted bins attach to the cabinet walls, so accurate measuring matters most here: both runners must be level, parallel and at the same height, with screws that will not penetrate the cabinet exterior.
- Door-mounted bins connect the cabinet front to the frame, so pulling the door brings the bin out in one motion. Convenient, but the front must be centred carefully so it lines up with neighbouring doors and drawers.
- Bins behind a hinged door open in two steps — door first, then pull the bin — and are often the simplest to fit, provided the frame sits far enough from the hinges to avoid contact.
What Tools Do You Need?
You won’t need a workshop, just the basics:
- Measuring tape and pencil
- Combination square and spirit level
- Cordless drill and a small drill bit
- Screwdriver
- Masking tape and safety glasses
- Vacuum or hand brush
- The manufacturer-supplied screws and brackets
Avoid swapping out the supplied screws unless you’re confident the alternatives suit both the cabinet material and the frame.
How Do You Measure the Cabinet?
Measuring is where most installs succeed or fail, so take your time. A product’s own dimensions and its minimum cabinet size aren’t always the same, so check the full specifications before you order.
Cabinet width alone does not determine bin capacity — frames, runners, lids and compartment layouts vary between products. Check the minimum internal width, depth and height stated on the product page, and see our pull out bin size and cabinet width guide for detailed sizing information.
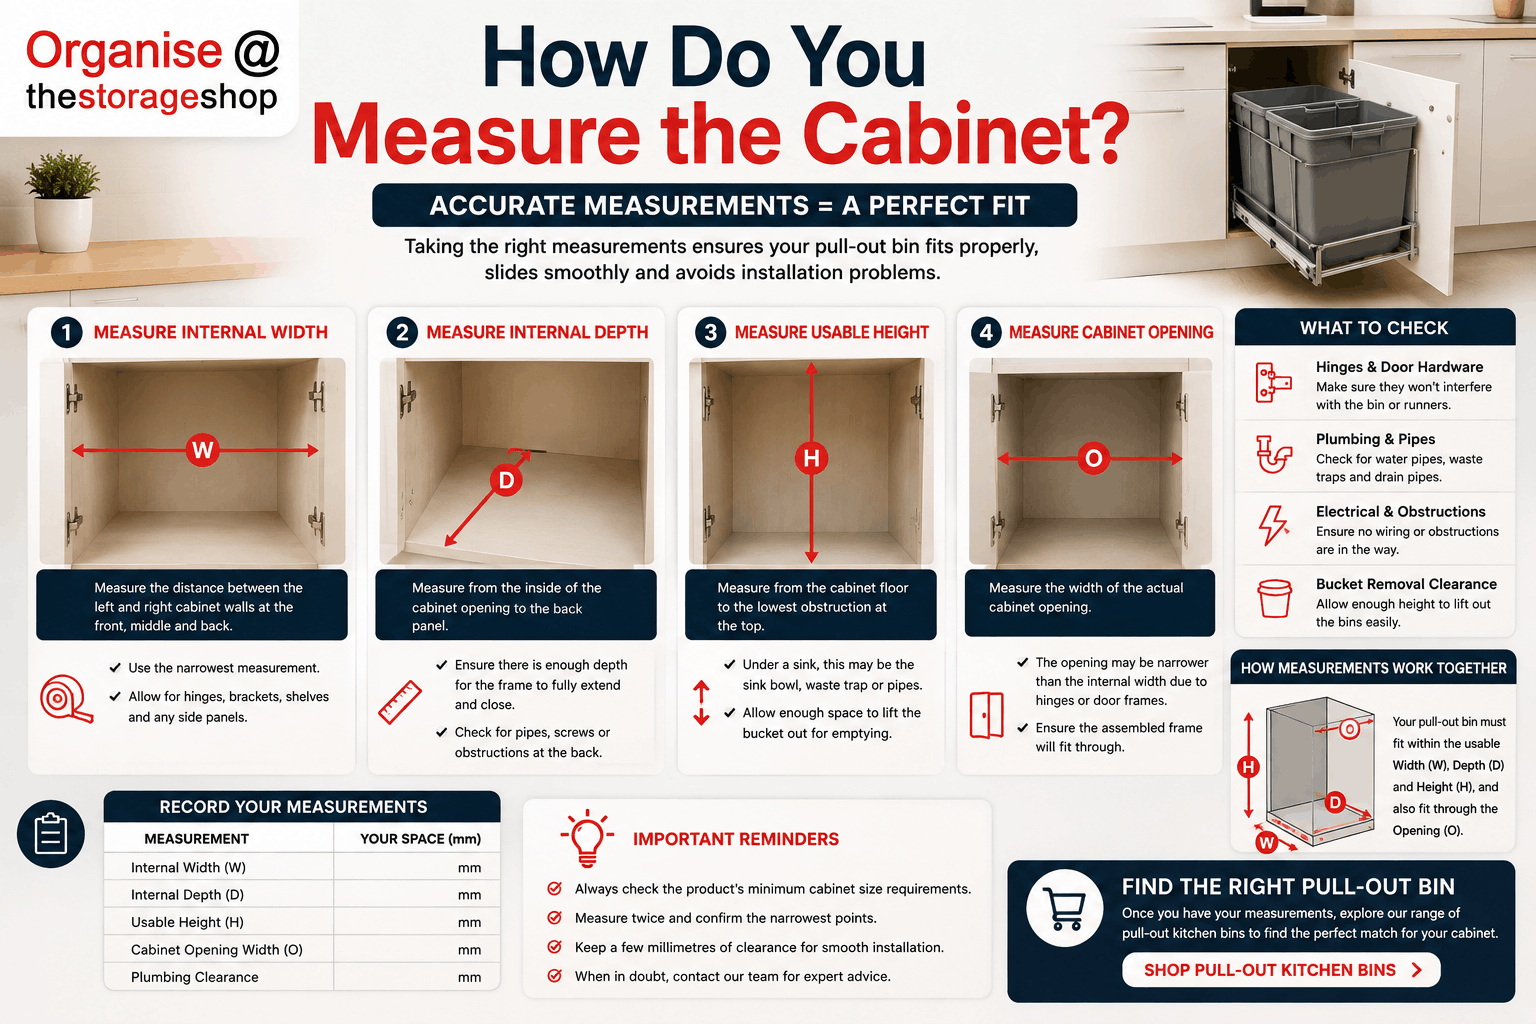
Take four measurements:
- Internal width — measure between the cabinet walls at the front, middle and rear, and use the narrowest figure. Allow for hinges, brackets, shelf supports and any decorative panels.
- Internal depth — from the inside front edge to the rear panel, leaving room so the frame closes fully without pressing on pipes or screws.
- Usable height — from the cabinet floor to the lowest obstruction. Under a sink that’s often the bowl, waste trap or water pipe, not the benchtop. Leave enough overhead space to lift the bucket out for emptying.
- Cabinet opening — a cupboard can be wide inside but have a narrower opening because of hinges or door frames, so confirm the assembled frame will pass through.
Jot these down before buying:
| Measurement to record | Your space |
| Internal width | ___ mm |
| Internal depth | ___ mm |
| Usable height | ___ mm |
| Cabinet opening width | ___ mm |
| Plumbing clearance | ___ mm |
How to Install a Base-Mounted Pull-Out Bin, Step by Step
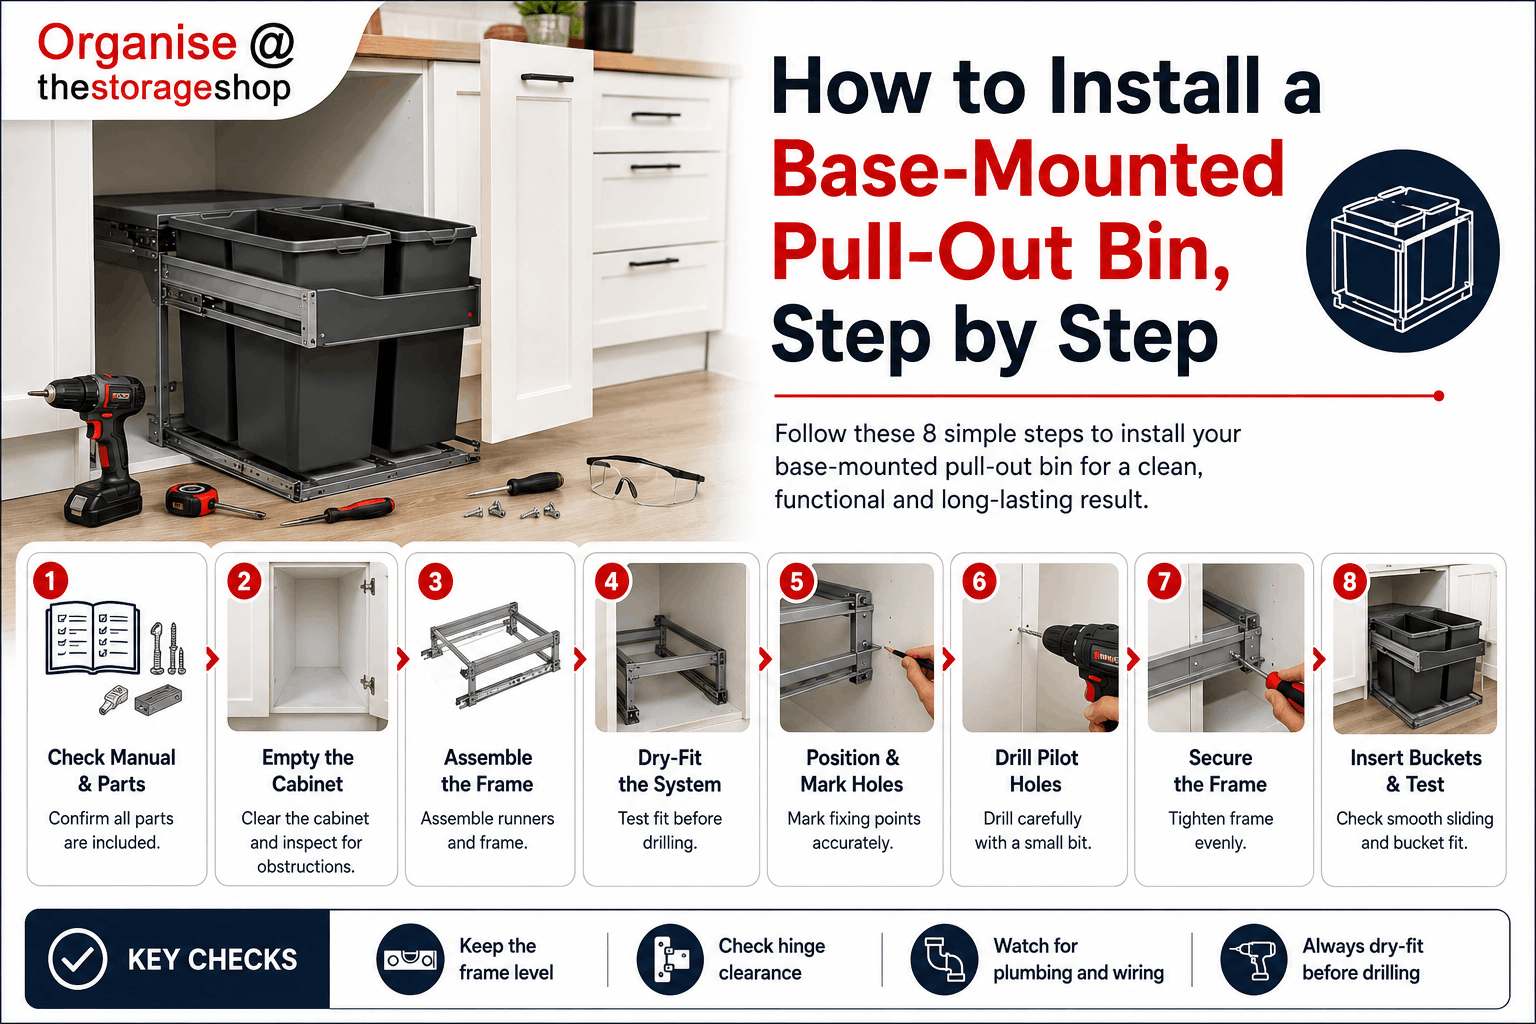
Step 1: Check the manual and parts
Open the instructions before assembling or drilling anything, and confirm all parts are present — runner frame, buckets, lid or lid frame, brackets, screws, and any door-mounting parts or spacers. Keep the manual nearby throughout.
Step 2: Empty and inspect the cabinet
Clear everything out and clean the floor so dust doesn’t throw off your positioning. While it’s empty, check for water damage, loose panels, protruding screws, existing holes, leaks or hidden wiring, and repair any structural issues before you fit the pull out bin.
Step 3: Assemble the frame
Put the runner frame together per the instructions — some arrive mostly built, others need brackets and runners attached. With the frame still outside the cabinet, check the runners extend and retract smoothly. Don’t fix anything permanently yet.
Step 4: Dry-fit the system
This is the most important step. Sit the assembled frame in the cabinet without screws, extend the runners fully, and confirm the frame clears the hinges, the bin doesn’t hit the door, the rear clears the back panel, pipes don’t obstruct it, and the buckets lift out cleanly. Dry-fitting can reveal many clearance and alignment problems before drilling.
Step 5: Position and mark
Move the frame to its final spot, using your square or tape to keep it parallel with the cabinet walls. Set the front position as the instructions specify — too far forward and the door won’t close, too far back and you lose easy access. Hold it firm and mark each fixing hole, then check the marks are straight, evenly spaced, clear of panel edges, and away from plumbing and wiring.
Step 6: Drill pilot holes
Use a bit smaller than the screw diameter to avoid splitting particleboard, and wrap masking tape around the bit as a depth marker so you don’t drill through the cabinet floor. Wear safety glasses and drill slowly.
Step 7: Secure the frame
Return the frame and insert the screws loosely. Don’t fully tighten one side before checking the other — secure it gradually, keeping it straight and level, and extend the runners a few times before the final tighten. If anything feels tight or uneven, loosen the fixings and realign the frame.
Step 8: Fit the buckets and test
Insert the buckets and fit the lid, checking each bucket sits securely, lifts out easily and doesn’t catch. Then open and close the system through several complete opening and closing cycles, watching and listening for rubbing, clicking, uneven resistance, hinge or pipe contact, or incomplete closing. Make small adjustments, then check every screw one last time.
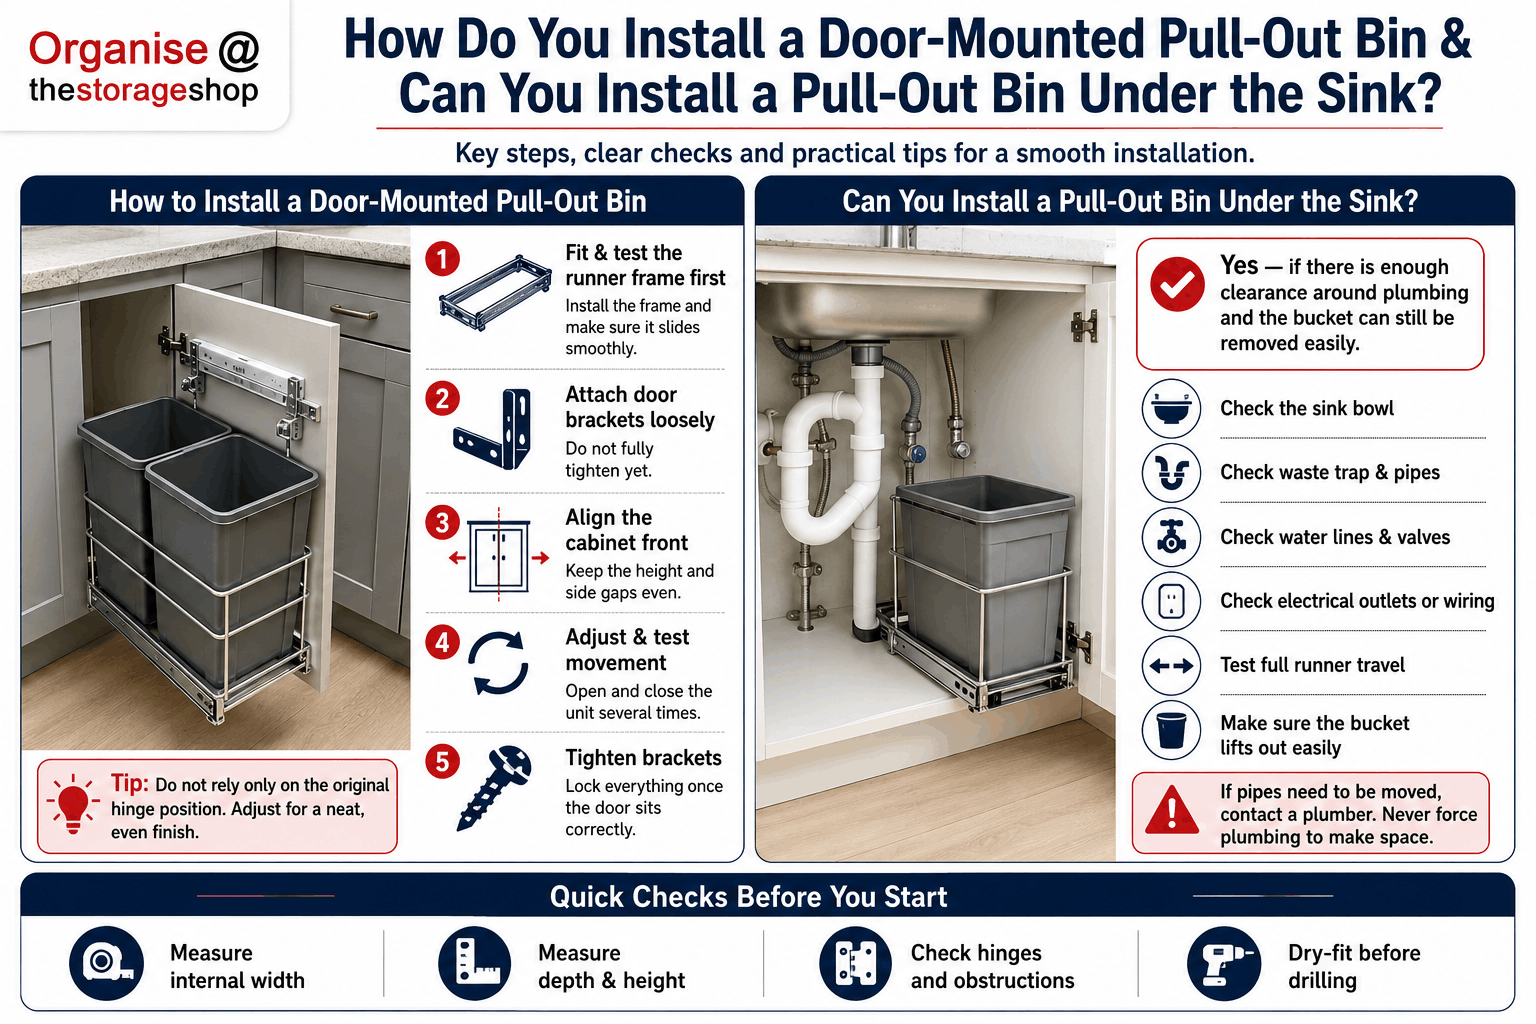
How Do You Install a Door-Mounted Pull-Out Bin?
Always fit and test the runner frame first. Once it moves correctly, attach the cabinet front loosely to the adjustable brackets, support the door at the right height, and match the gaps around neighbouring doors and drawers. Open and close the system, adjust the door vertically and horizontally until it sits evenly, then tighten the brackets. Don’t rely only on the original hinge position — the frame and brackets may need the front sitting slightly differently.
Can You Install a Pull-Out Bin Under the Sink?
Yes, as long as there’s room around the plumbing. Before drilling, locate the sink bowl, waste trap, water supply lines, any dishwasher connections, shut-off valves and electrical outlets. Extend the dry-fitted frame through its full travel and make sure it never rubs or presses on a pipe, and check the bucket still lifts out once installed — in tight under-sink cabinets, an offset or narrower bin often works better than a centred one. If pipes genuinely need moving, call a plumber; never bend or force plumbing to make space.
Real Installation Example
To show how these steps come together, here is the format we use to document a real fit-out. Complete it with your own product and measurements, and add photographs at each stage before publishing:
- Product: [exact product name and SKU]
- Mounting style: Base mounted
- Cabinet internal width: ___ mm
- Cabinet depth: ___ mm
- Available height: ___ mm
- Main obstruction: ___
- Adjustment required: ___
- Installation reviewed by: [name and role]
Support it with original photos of the cabinet measurements, the components before assembly, the dry-fit, the pilot-hole positions, the secured runner frame and the finished installation. Real, first-hand images like these make the guide more distinctive and trustworthy than a generic walk-through.
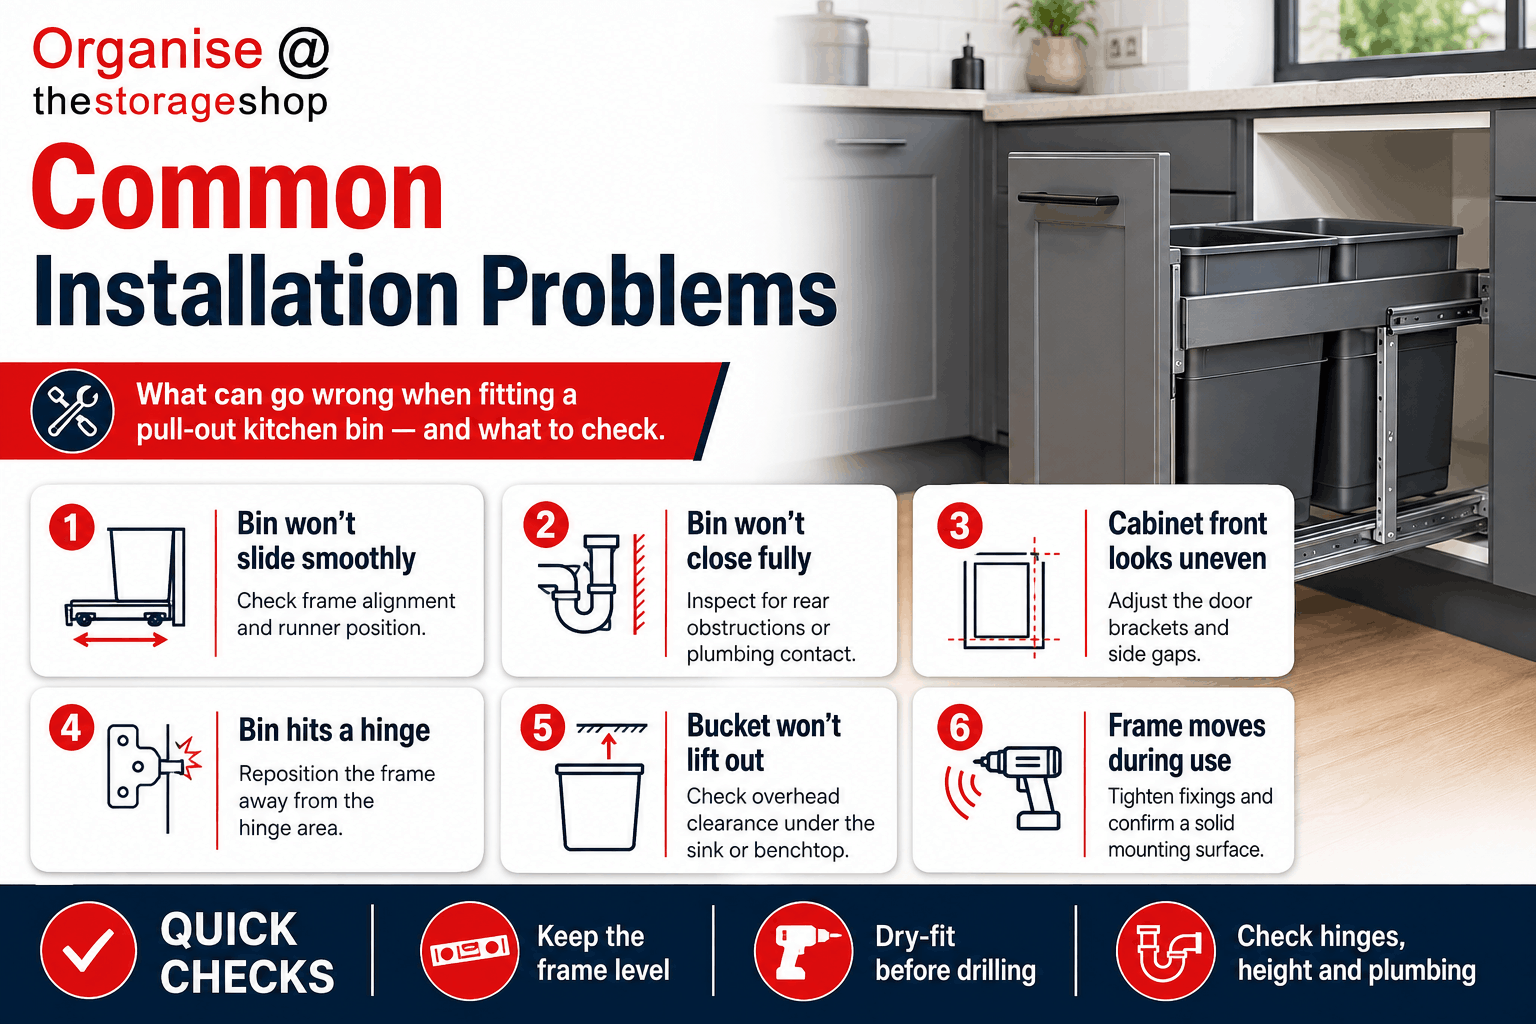
Common Installation Problems
| Problem | Likely cause | What to check |
| Bin won’t slide smoothly | Frame is out of square | Loosen, realign and retest the frame |
| Bin won’t close fully | Rear or plumbing obstruction | Inspect the full runner path |
| Cabinet front looks uneven | Door brackets misaligned | Adjust the height and side gaps |
| Bin hits a hinge | Frame set too close | Move the frame away from the hinge |
| Frame moves during use | Loose or unsuitable fixings | Check screws and mounting surface |
| Bucket won’t lift out | Not enough overhead clearance | Check the sink, lid and benchtop |
| Soft-close won’t engage | Runner obstruction or misalignment | Check both runners and the load |
Mistakes to Avoid
The most common slip-ups are measuring only the external cabinet width, buying before checking the cabinet opening, drilling before dry-fitting, forgetting hinge and bucket-removal clearance, fitting the frame out of square, using screws that are too long, and attaching the cabinet front before testing the runners. Checking the position carefully can prevent many common installation errors.
Planning Pull-Out Storage Across Your Kitchen
A bin is most useful right where waste is created — near the sink, dishwasher or main prep area — but make sure the open bin won’t block a walkway or stop the dishwasher opening. If you’re planning a bigger storage upgrade, the same measuring and mounting skills carry across, and our guide to pull out pantry systems in Australia covers cabinet sizes, pantry styles and installation. Planning your pantry and waste zones together makes for a more practical layout.
Why Choose The Storage Online Shop?
The Storage Online Shop is an Australian-owned cabinet-storage specialist with more than 30 years of industry experience. Our kitchen-bin range includes pull-out, under-sink, cupboard and door-mounted options designed for different cabinet configurations and waste-separation needs.
Product listings provide capacity, mounting and cabinet information to help customers compare suitable systems before ordering. Expert support is also available when you need help matching a product to your cabinet measurements. Explore the complete kitchen bin collection to compare available sizes, mounting styles and features.

Frequently Asked Questions
Do pull-out bins attach to the cabinet floor?
Many do — a base-mounted runner frame fixes to the cabinet floor, while other designs attach to the side panels or the cabinet front.
Do I need to remove the cabinet door?
Not always. A bin behind a hinged door keeps the original door; a door-mounted bin usually needs the cabinet front connected to the runner frame.
What cabinet size do I need?
Cabinet width alone doesn’t set capacity, since frames, runners and lids vary between products. Check the minimum internal width, depth, height and opening on the product page, or see our pull out bin size and cabinet width guide for detailed ranges.
Why is my pull-out bin not closing?
Common causes are runner misalignment, contact with plumbing, hinge obstruction, an uneven base, or poorly positioned door brackets.
Can I replace an old pull-out bin?
Usually yes, provided the new system fits the existing cabinet dimensions and fixes to a suitable mounting surface.
Should I install the frame before attaching the door?
Yes. On a door-mounted system, secure and test the runner frame first, then align the cabinet front.
Find the Right Pull-Out Bin for Your Cabinet
A well-fitted pull-out bin improves access, keeps waste out of sight and makes better use of your cabinet space — and the secret is choosing a system that matches your cabinet’s internal dimensions and mounting style. Measure carefully, check the specs, and always dry-fit before you drill. Explore the full range of kitchen bins from The Storage Online Shop, including pull-out, under-sink and in-cupboard solutions for a wide range of kitchen layouts.